
At a Glance
- Spider mites are nearly invisible pests that leave telltale webbing and pale, stippled leaves. Catching them early makes all the difference.
- The gentlest treatments can work: start with a strong water spray, then introduce beneficial predators before reaching for any spray at all.
- We don't recommend neem oil — it can harm bees, butterflies, and the beneficial insects your garden depends on.
By Nicole Johnsey Burke: Founder of Gardenary and Author of Kitchen Garden Revival
The Day I Found Spider Mites On My Plants
When I first started gardening, I spotted some webbing and told myself it was probably just a garden spider passing through. By the end of the week, three of my tomato plants and some neighboring spinach looked like they'd spent a week in the Sahara desert — leaves were dirty looking, pale, stippled, and dropping.
I looked underneath the leaves to get a close look. I had spider mites. And I had waited too long.
If you're here, you probably found something on your plants that doesn't look quite right. If you caught it early (and early is everything with spider mites), then there is still plenty that you can do to help your plants.
How to Treat Spider Mites

Step 1
Step 1: Identify Spider Mites on Your Plants
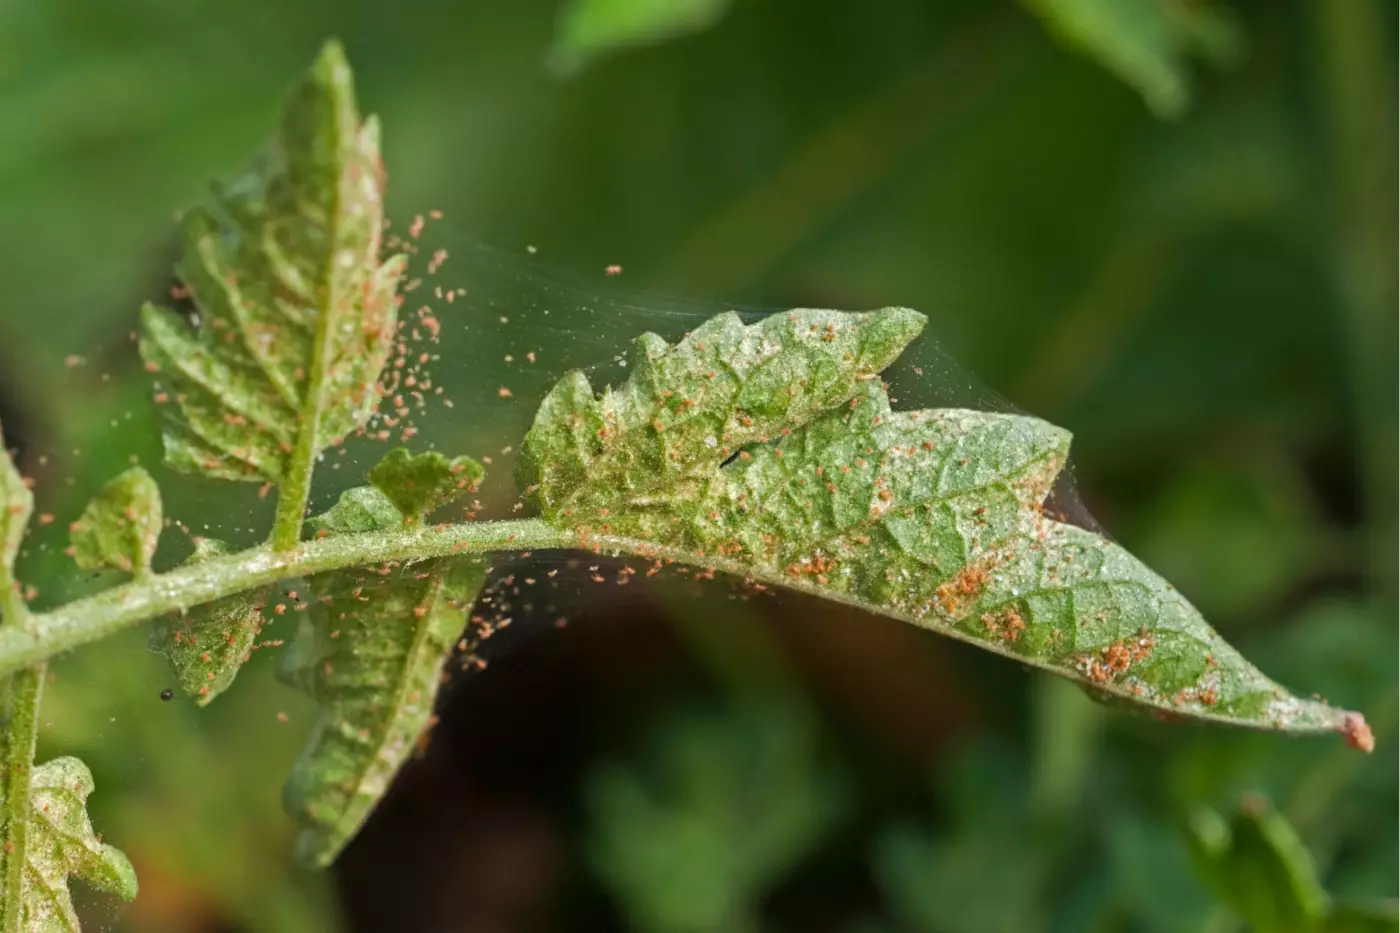
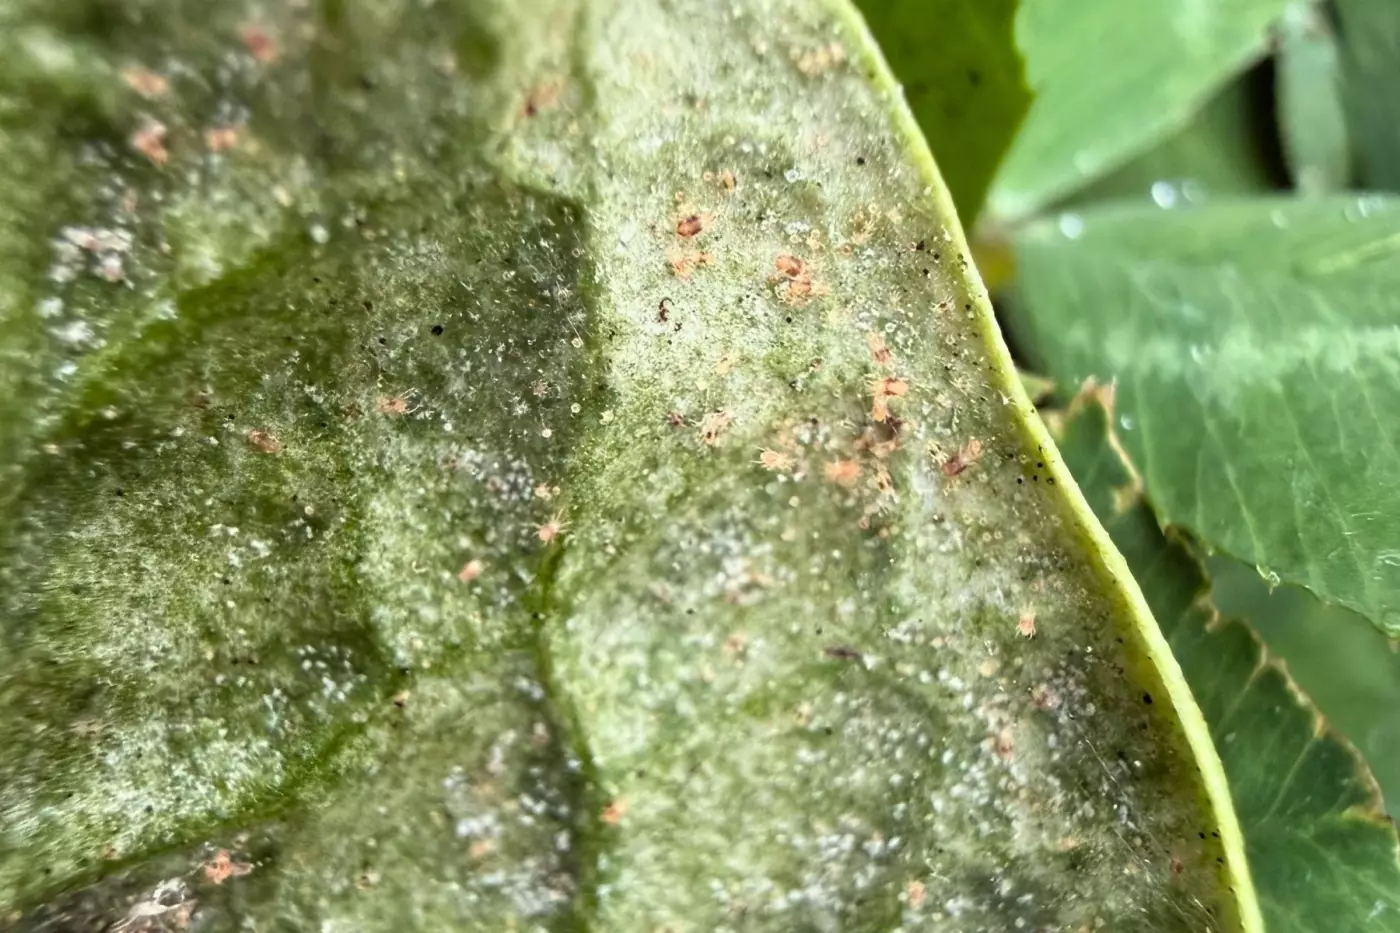
Spider mites are not insects. They're arachnids — tiny relatives of spiders and ticks — and most of the time you won't see the mites themselves before you see what they leave behind. The damage comes first.
Signs of spider mites on plants:
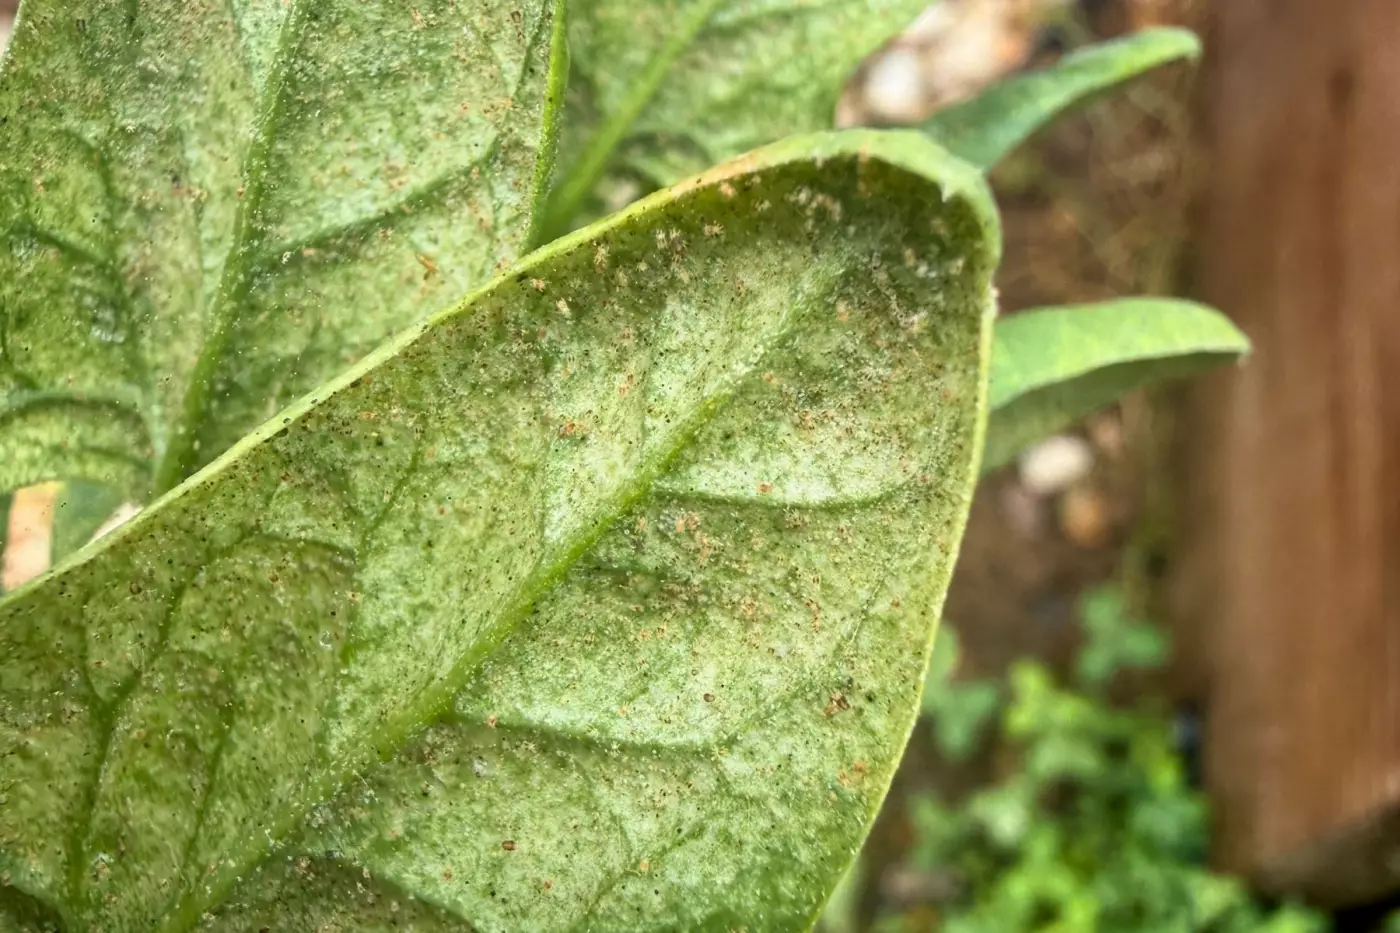
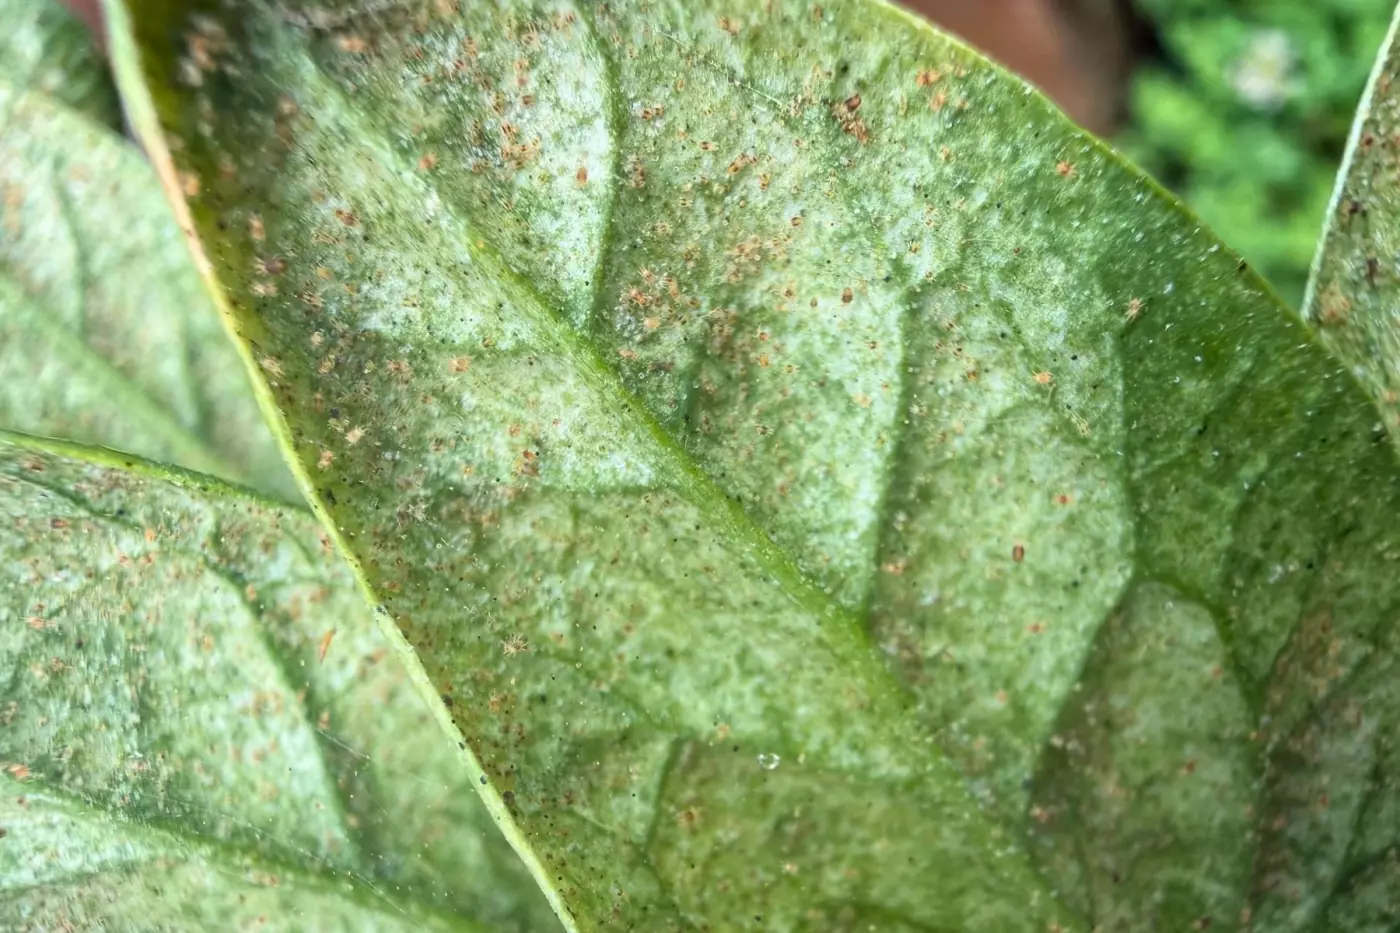
- Stippling on leaf surfaces — hundreds of tiny pale yellow or white dots across the tops of leaves, where mites have pierced individual cells and drained them
- Dirty Looking Leaves - That dirty appearance isn't actually dirt — it's the mites themselves, along with their shed skins and waste, all collecting on the leaf surface. It looks like dirt. It's not.
- Fine webbing — the most recognizable sign; delicate, dusty-looking webbing on the undersides of leaves, between stems, or draped across leaf clusters
- Bronzing or silvering — leaves take on a dull, silvery, or almost metallic sheen as damage accumulates
- Yellowing and curling — leaves turn yellow and curl under at the edges, especially as the infestation progresses
- Premature leaf drop — heavily infested plants shed leaves early, which significantly weakens them going into the rest of the season
How to confirm it's spider mites and not something else:
Hold a white sheet of paper beneath a suspicious leaf and tap the leaf firmly several times. Look closely at the paper. If you see tiny moving dots — some reddish-brown, some pale yellow, some nearly translucent — those are your mites. They're roughly the size of a period at the end of a sentence, and they come in many colors.
You can also inspect the undersides of leaves with a magnifying glass. Spider mites have eight legs, oval bodies, and tend to cluster in groups.
Plants most vulnerable to spider mites:
- Tomatoes, peppers, and eggplant
- Cucumbers, squash, and melons
- Beans and strawberries
- Roses and many flowering ornamentals
Can Spider Mites Hurt or Bite Me?
Good news! Spider mites are not interested in you at all.
These little guys are plant feeders, not parasites, and they cannot survive on human or animal hosts. They don't bite, they don't sting, and they pose no health risk to you, your kids, or your pets.
That said, some people with sensitive skin do notice mild irritation after handling heavily infested plants — not from bites, but from the mites and their debris making contact with skin. If that's you, just wear gloves when you're working with affected plants and wash your hands and forearms well afterward. That's all it takes.

Step 2
Step 2: Start Gentle — Spray Plants Regularly with Water
Before you reach for any spray or treatment, start with water. A strong blast of water is genuinely one of the most effective first responses to a spider mite infestation, and it costs nothing.
How to do it:
Use a garden hose with a jet or strong spray nozzle and blast the undersides of every affected leaf thoroughly. Spider mites are fragile and don't grip well. The water stream knocks them off the plant and breaks up their webbing and egg clusters.
- Focus especially on leaf undersides, where the mites live and lay eggs
- Spray every two to three days for at least two weeks
- Water in the morning so leaves can dry before evening — wet foliage at night invites fungal problems
- Don't skip days — you need to disrupt the reproduction cycle, and a female mite can lay up to 200 eggs in her lifetime
Why this matters beyond just removing mites:
Spider mites thrive in hot, dry, dusty conditions. Regular water spraying raises the ambient humidity around your plants, making the environment less hospitable to new mite populations. It also washes off dust that mites use for shelter and lays eggs beneath. This is one of those situations where the simplest answer really is the best first answer.
For mild infestations caught early, consistent water spraying alone often resolves the problem completely. Give it a few days to a week before deciding you need to escalate.
Stop Spraying. Start Gardening Smarter.
No harsh sprays. No endless guessing. Just a thriving, abundant garden that practically protects itself. With the Organic Pest Control Method, you’ll learn the exact steps to grow naturally and confidently, season after season.
Step 3
Step 3: Remove Infested Leaves and Keep Plants Well-Watered Throughout
This isn't a one-and-done step — it runs alongside everything else you do. Removing heavily affected leaves and keeping your plants properly hydrated are two of the most important ongoing actions you can take.
Removing infested leaves:
- Inspect plants every few days and pinch off any leaves or cut stalks with heavy webbing, severe stippling, or visible mite clusters
- Seal removed leaves immediately in a plastic bag and put them in the trash — do not add them to your compost pile
- Wash your hands and wipe your pruners with rubbing alcohol after handling infected foliage before touching any other plant
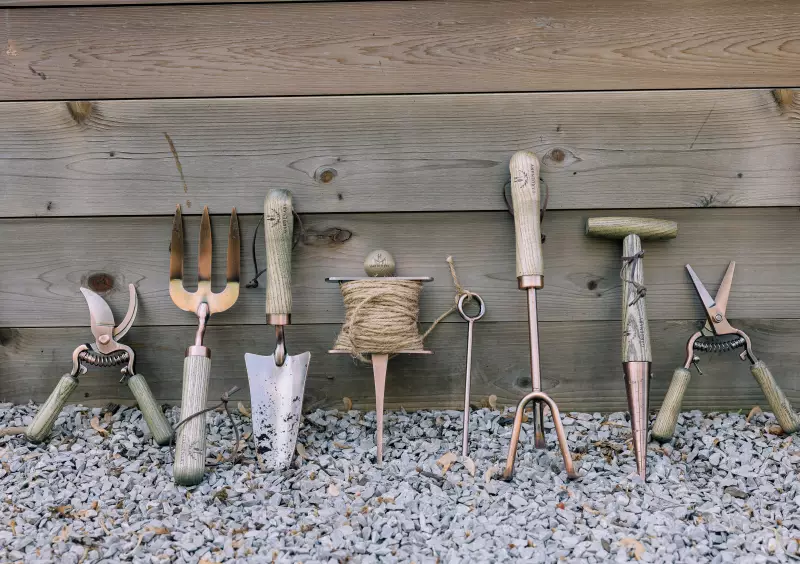
- A good pair of pruners you can clean and sterilize easily makes this so much simpler — it's the kind of tool you'll reach for every single time
Keeping plants well-watered:
Well-hydrated plants recover faster, resist further infestation better, and simply have more resilience when pests arrive.

Step 4
Step 4: Introduce Beneficial Predators
This is the step I love most, because it's the one where you let nature do the work for you. Spider mites have natural enemies, and those enemies are extraordinarily effective when given the chance.
Ladybugs:
Adult ladybugs and their larvae both feed on spider mites, as well as aphids and other soft-bodied pests. You can encourage naturally occurring ladybug populations by planting dill, fennel, yarrow, and other umbellifers nearby, or purchase them for release. Release at dusk near the infested plants.
Lacewings:
Green lacewing larvae (sometimes called aphid lions) are voracious predators of spider mites, aphids, and a wide range of soft-bodied pest insects. Lacewing eggs and larvae are available from biological control suppliers. Like ladybugs, they benefit enormously from a garden planted with flowering herbs and companion plants that provide habitat.
The principle behind all of this is one I come back to again and again: work with nature, not against it. A garden that supports beneficial insects through plant diversity, organic growing practices, and a real reluctance to reach for sprays is a garden that increasingly takes care of itself.
Predatory mites:
Phytoseiulus persimilis is the heavy hitter here. This predatory mite species feeds almost exclusively on spider mites and is commercially available through many garden suppliers. It moves fast, reproduces quickly, and can bring a population down significantly within days in the right conditions. Other effective species include Neoseiulus californicus (better for lower infestations and higher temperatures) and Galendromus occidentalis.
To use predatory mites:
- Order them from a reputable biological pest control supplier
- Release them in the evening or early morning, avoiding direct sunlight
- Do not apply insecticidal sprays for at least 48 hours before and after release — you need them alive

Step 5
Step 5: Escalate to Insecticidal Soap If Needed
If water spraying and beneficial predators haven't brought a severe infestation under control after two to three weeks, insecticidal soap is a reasonable next step. It's one of the gentler organic options available, but it still warrants care, because "organic" doesn't automatically mean "harmless to all insects."
How insecticidal soap works:
The fatty acids in insecticidal soap penetrate and disrupt the outer coating of soft-bodied insects and mites, killing them on contact. It breaks down quickly and leaves no persistent residue, which is one of its advantages.
How to use it safely:
- Apply in the early morning or evening — never in full midday sun, which can burn foliage
- Spray directly onto mites, coating all leaf surfaces thoroughly, especially undersides
- Reapply every three to five days for two to three weeks
- To minimize harm to beneficial insects: spray only the specific affected plants, apply when bees and butterflies are least active (early morning or evening), and never spray open flowers
- You can make a DIY version with 1 tablespoon of pure castile soap (like Dr. Bronner's unscented) per quart of water — test on a small leaf area first
Insecticidal soap kills on contact only. It doesn't leave a residue that will keep working after the spray dries, which means you must coat the mites directly and reapply consistently.
Free Seeds! Get Our Top 10 Essential Garden Seeds
Start your garden fast with our FREE easy seed set. Get 10 packs of seeds, including arugula, zucchini, spinach, zinnias, peas, carrots, and more!
Why We Don't Recommend Neem Oil for Spider Mites
Neem oil is everywhere in organic gardening advice — but at Gardenary, we don't recommend it. Here's why.
Neem oil contains azadirachtin, a compound that disrupts insect development. "Organic" doesn't mean selective, and azadirachtin doesn't only affect spider mites.
Who it harms:
- Honeybees — toxic to larvae even at low concentrations; contaminated pollen brought back to the hive affects the whole colony
- Bumblebees — similar larval toxicity; foragers show reduced activity after exposure to treated flowers
- Butterflies and moths — azadirachtin interferes with metamorphosis; caterpillars that ingest it can fail to pupate
- Aquatic invertebrates — runoff into water disrupts ecosystems at the base of the food chain
One more problem:
- Spider mites can develop resistance to neem oil with repeated use, making it less effective over time
Can You Eat Vegetables From Spider-Mite-Infested Plants?
Yes, but it might not taste great depending on the infestation. In most cases, vegetables from plants with spider mites are safe to eat.
A few things to keep in mind:
- Wash produce thoroughly before eating — mites and eggs can be present on the surface, especially on fruits and vegetables with textured skin
- Inspect for secondary damage — heavily infested plants sometimes develop fungal issues alongside a mite problem; if the fruit itself looks discolored, mushy, or off, trust your instincts and don't eat it
- Tomatoes, cucumbers, peppers, and beans grown on infested plants are generally fine once washed well
- Leafy greens need extra attention — wash very carefully, and consider blanching before eating if the infestation was severe on the foliage you're harvesting
A spider mite problem doesn't mean you have to lose your harvest. It means you need to treat the plant and be diligent about washing what you pick. Leafy greens are a little more difficult, but they can be salvaged.
How to Prevent Spider Mites From Spreading to Other Plants
Containment matters as much as treatment. Spider mites spread fast — wind carries them, and you carry them on your hands, gloves, and tools without knowing it.
Do these things immediately when you find spider mites:
- Stop touching other plants after handling an infected one — wash your hands and change gloves before moving on
- Clean your tools between plants — wipe pruners and scissors with rubbing alcohol or a diluted bleach solution
- Remove and bag heavily infested leaves before putting them in the trash — never compost them
- Spray neighboring plants preventively with insecticidal soap or plain water even if they don't yet show symptoms
- Maintain consistent watering — stressed, drought-dry plants are far more vulnerable to infestation and spread
If you have container plants, move affected ones away from the rest of your garden immediately. Isolation is the fastest way to slow the spread.
Other Important Things to Know About Spider Mites
They reproduce extraordinarily fast. In warm conditions, a new generation can hatch in as few as five days. This is why two to three weeks of consistent treatment matters — you need to break the reproduction cycle across multiple generations, not just knock down the visible adults.
Chemical pesticides often make things worse. Many conventional broad-spectrum pesticides kill the natural predators of spider mites — ladybugs, predatory mites, lacewings — without effectively killing the mites themselves, because mites often develop resistance faster than their predators do. This is one of the clearest arguments for staying fully organic: you preserve the beneficial insects that would naturally keep mite populations in check.
Plant diversity is your long-term defense. Gardens with a mix of vegetables, herbs, and flowering plants naturally attract and support populations of beneficial predatory insects. Planting dill, cilantro, yarrow, fennel, marigolds, and sweet alyssum near your vegetable beds creates habitat for the good guys year-round.
Prevention beats treatment every time. Healthy, well-watered plants in fertile soil resist spider mites far better than stressed plants. Consistent watering, organic soil amendments, and good airflow are your best long-term defense — and none of that requires a spray bottle.
Having the right tools makes all the difference when you're dealing with pests. Clean, sharp pruners let you remove infested leaves quickly and precisely, and being able to sterilize them between plants is genuinely important for containment. Gardenary's Garden Tool Kit is built for exactly this kind of real-garden problem-solving. These are the tools I reach for every single time something goes sideways in my beds.
7-Piece Copper Plated Garden Tool Set
Tend your garden like a pro with our all-in-one tool package, thoughtfully curated for every kind of gardener. This essential set equips you with high-quality, durable tools to dig, plant, prune, and grow—season after season.
FAQ: Spider Mites on Plants
What do spider mites look like on plants? Spider mites are barely visible to the naked eye — roughly the size of a period on a page. They appear as tiny moving dots, often reddish-brown, pale yellow, or translucent, on the undersides of leaves. The first visible signs are usually the fine webbing they produce and pale stippling across leaf surfaces.
What causes spider mites on plants? Spider mites thrive in hot, dry, dusty conditions. They're most common during heat waves and drought periods, or in gardens with poor air circulation. Overusing pesticides that kill natural predators is another common cause of mite population explosions.
How long does it take to get rid of spider mites? With consistent treatment every two to three days, most spider mite infestations are under control within two to three weeks. The key is not skipping treatment cycles — you need to eliminate newly hatched mites and eggs across multiple generations, not just the adults you can see.
Can spider mites live in soil? Spider mites primarily live on plant foliage, not in soil. However, some species can overwinter in soil or plant debris, which is why thorough end-of-season clean-up matters — removing dead plant material eliminates overwintering habitat.
More About Pests
Sources
- 'Spider Mite Management' — University of California IPM Program: https://ipm.ucanr.edu/PMG/PESTNOTES/pn7405.html