

Time to Plant for Your Spring Garden
If your garden has been in hibernation mode all winter, then it's time to wake it up and get growing! Spring is the perfect time to start gardening. Many types of flowers, herbs, leafy greens, and root vegetables are perfect to plant right now.
But before you plant a single thing, take a few minutes to prep your garden bed. First, pull out any spent plants. You'll also want to prune back and dead branches that overwintered, and dig up any root balls that will interfere with new planting.
Next, check your soil level. Over winter, soil in a raised bed typically drops a few inches — totally normal. But that missing soil depth is something you don't want to lose. Top off your raised bed with compost before you do anything else.
Measure the gap from the top of your soil to the top rim of the bed, then calculate how much compost you need to fill it back up.
Here's the simple math: width x length x depth (in feet) = cubic feet of compost needed. So a 4x8 bed with 6 inches of missing soil looks like this: 4 x 8 x 0.5 (because 6 inches = half a foot) = 16 cubic feet.


Now let's look at the five steps to plant your garden up for spring.
Step One
Plant Your Spring Flower & Herb Border
First, we're going to plant perennial herbs and flowers around the border of the garden to frame in everything. That's the easiest way to get started when you're planting for a new season.
Perennial herbs that love growing in spring include chives, rosemary, sage, oregano, and thyme. Flowers that thrive in the cool season include pansies and snapdragons. If you're already past your last frost date, you can do basil and marigolds, as well.


Tips to Plant Nursery Plants
Head to your local nursery to grab some well-grown herb plants and flower flats. Look for flowers that aren't blooming yet for best results.
For each plant, dig a hole that's twice as wide and the same depth as the pot the plant was in. Adding a little bit of extra width in the planting hole gives the roots some encouragement to spread out and settle in faster, but you don’t want to go too deep. The easiest way to do this is to dig the hole, then place the pot inside to be sure it fits. Then add the plant and fill in with soil. Some plants, perennial herbs especially, benefit from having you loosen up their roots a little bit before you plant them.


Watch Nicole Start a Spring Garden on YouTube!
Step Two
Plant Large Plants in the Middle of Your Raised Bed
As soon as you've got your herb and flower border planted, it's time to add those larger plants down the center of the bed. These will go in as seedlings that you've either started by seed indoors or purchased from your local nursery.
Large plants in the cool season include things like cabbage, kale, cauliflower, and mustards.
A quick note on how I categorize plants — because this comes up a lot. In my planting method, I divide everything into three groups: leafy greens, root crops, and fruiting crops. That third category, fruiting crops, sometimes raises eyebrows. Broccoli as a fruit? Bear with me. When I say "fruiting crop," I mean anything where what we eat comes after the leaves — whether that's a flower, a pod, or actual fruit. Broccoli is technically a flower head. Sugar snap peas come from a flower. So yes, they're in the fruiting category. These are your biggest, most space-hungry plants, and they go down the center of the bed first, before everything else gets filled in around them.
Read more about my method in my book, Leaves, Roots and Fruit.


Tips to Plant Seedlings
Unlike with plants, do your best not to disrupt the roots of these seedlings. Try to gently take them out of their container and hardly touch them at all. Just like your plants, you’re going to dig a hole that’s twice as wide and the same depth as the seedling, and then you’re going to plant to the neck of the seedling. The neck of the plant is simply where the soil meets the main stem. You don’t want to cover that neck on any of your new plants (until you get to tomatoes in the warm season).
Be certain your transplants have had one to two weeks of "hardening off" to adjust to the temperature change and direct sunlight.


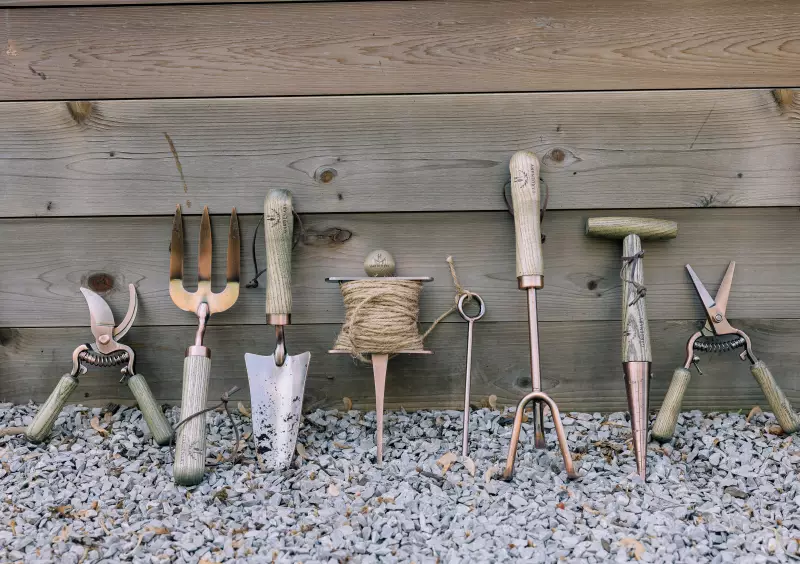
7-Piece Copper Plated Garden Tool Set
Tend your garden like a pro with our all-in-one tool package, thoughtfully curated for every kind of gardener. This essential set equips you with high-quality, durable tools to dig, plant, prune, and grow—season after season.
Step Three
Plant Bulbs & Medium-Size Plants
It's time to tier down and plant your second largest types of plants, which are things like spring-planted garlic, onions, Swiss chard, celery, parsley, and cilantro.
Swiss chard, celery, parsley, and cilantro can go in as seedlings.
Garlic and onions are, of course, bulbs.


Tips to Plant Bulbs
To plant garlic, dig a hole that’s not any deeper than the clove but about twice as wide. Make sure the tip is pointed up and the root end is down so the roots can spread below.


Start your dream garden. Watch the free class!
Step Four
Fill in the Garden Bed With Seeds
Here's the step I get most excited to tell people about — especially if you're trying to keep your garden budget in check. Step four is planted entirely from seed, and the math on this is almost too good to be true! One plant from a nursery costs you $3 to $5. One seed packet gives you 30, 40, or sometimes 100 plants. You do the math. But here's the thing: for the crops in step four, planting from seed isn't just more economical. It's actually the better way to grow them. Root crops and leafy greens have delicate shallow roots that don't like being moved or disturbed. Starting them right where they'll grow means healthier plants and better harvests. Saving money and doing it the right way? That's my kind of gardening.
Once you've got all your spring herbs, flowers, plant starts, and seedlings planted, it's finally time to fill in the rest of the garden with seeds. These seeds will go right inside the herb and flower border. If you have empty spaces on the very outer edge of your garden, you can also use seeds to fill these in, as well.
Some of my favorite seeds to plant for spring are lettuce seeds—there's buttercrunch, spring mix, red sails, Rocky Top, and more. Other small leafy greens that are ideal to direct sow in the garden include arugula and spinach.
It's also a good idea to sow some cilantro seeds, even if you planted small cilantro plants because cilantro typically doesn't last very long in the garden. If you want more flowers, you can plant some chamomile and calendula seeds. Next to a trellis, you could do fava bean seeds or sugar snap peas seeds. Your trellis could be covered in peas in just two months.
Lastly, don't forget about your spring root crops, so carrots, radishes, and beets. If you're running out of cool weather, I recommend French breakfast radishes. They're my all-time favorite, and they're ready in just 28 days.


Tips to Plant Seeds
Some seeds, like peas, benefit from being pre-soaked before you plant them inside your garden, so check the back of your seed package for instructions. The overnight soaking starts to break down the outer coat on the seed so it germinates quicker with less risk of rotting in the soil before sprouting.
Keep in mind that seeds need to be planted about twice the depth of their width. You might be surprised how tiny some seeds are. You might even wonder how in the world you’re going to measure twice the width of something this tiny. The answer is you don't have to. Just scratch the surface of the soil and place the seed in the spot, then barely sprinkle some soil on top. Pat down the soil a bit with your hand to ensure the seed has good soil contact. This would be how you'd plant carrot seeds or lettuce seeds.
Since you’ve planted the biggest things first and moved your way down to the seeds, look around the garden space and make sure your seeds will have some sunlight on them with all those other plants around them. It's easier to visualize this now that your bigger plants are in place. Your seeds will be the most hungry for spring sunshine because they rely on the sun to germinate, so where you place them is important.
Step Five to Plant Your Garden for Spring
Water Everything in & Add Plant Tags
Water your new plants in very gently, preferably with a watering can, and very close to the soil, right at the roots. When you’re watering newly planted seeds, use a gentle spray (think soft rainfall) so you don't end up displacing all those seeds you've just planted, which would be no fun.
Then commit to watering every single day for the next two weeks. I mean it — every day. This is the step that determines whether all the work you just did in steps one through four actually pays off. Seeds need consistent moisture to germinate. New transplants need consistent moisture to establish. Skip a day or two in the first two weeks, and you risk losing plants that were already off to a great start. Set a reminder on your phone if you need to. Two weeks of daily watering is a small commitment for a whole season of harvests.
Once you have planted everything, make sure to add plant tags, especially to mark where you've planted your seeds.
The first one to two weeks of your plants' lives inside the garden are the most sensitive. That’s the time when you want to be watering a little bit more and watching them for any signs of wilt or disease or difficulty adjusting.
And that's it. In about four weeks, your garden is going to be packed to the brim with so many delicious and wonderful things to harvest!


Time to Plant up Your Garden for Spring!
I hope you’re feeling confident and ready to start planting your own garden. Don't be afraid to really pack in those plants in your raised beds. They can handle it, I promise. If you notice some blank spots in a couple weeks, come back out and plant some more seeds. This is how you maximize the ROI on your space.
Remember to begin with the biggest plants and work down to the smallest using your planting plan. If you’re packing in the plants the way I would do, then you’re going to have a wide variety of plants growing together, which is my personal favorite garden bed.
Make sure to take lots of pictures so you can look back on this day in just a few short weeks when your garden is bursting with healthy plants. You're about to be harvesting the most flavorful salads you've ever had in your life!
Happy spring planting!

