
Join Our Free Online Workshop!
Ready to finally grow a garden that works? Join our free Garden Game Plan workshop and walk away with a clear, simple plan so you know exactly what to plant, where to plant it, and when, without the overwhelm.


Our Favorite Way to Build an Inexpensive Raised Bed
When I first started my garden consulting business, I made all of the raised beds myself. I'm a gardener by trade—and not a carpenter—for a reason, so I came up with a simple way to construct a wooden raised bed using minimal tools.
This detailed guide will show you the step by step to create a beautiful, long-lasting raised garden bed using my simple construction process. Trust me, following these steps (and using any of my suggested modifications) will save you so much time, frustration, and money if you've been searching for inexpensive raised garden bed ideas.
Note: I call this my $100 raised bed. That's how much the cedar boards, framing angles, and hardware originally cost. Unfortunately, the price of cedar keeps increasing, so budget for a little over $100 total. Prices may vary depending on your location.
The step-by-step directions below will focus on how to create a 4'x4'x1' cedar garden bed, but I'll also include modifications to apply to nearly any shape or size garden you'd like to create, including DIY raised bed garden plans for the following sizes:
- 2’x8’x1’
- 4'x4'x6"
- 4'x6'x1'
- 4'x8'x1'
- 2'x6'x1'
All right, if you're ready to learn how to build a budget-friendly raised garden bed, let's roll up our sleeves and get to work!
Tools and Supplies Needed


Tools Needed for Wooden Raised Bed Construction
- Saw (not needed if you have the store cut the wood pieces for you, which is what I do)
- Pencil and tape measure to mark the boards and holes for drilling
- Hand drill for creating holes for each hex screw
- 1/4" drill bit (or appropriate size for holes)
- Bolt tightener to tighten the screws and nuts together
- Framing square (optional)


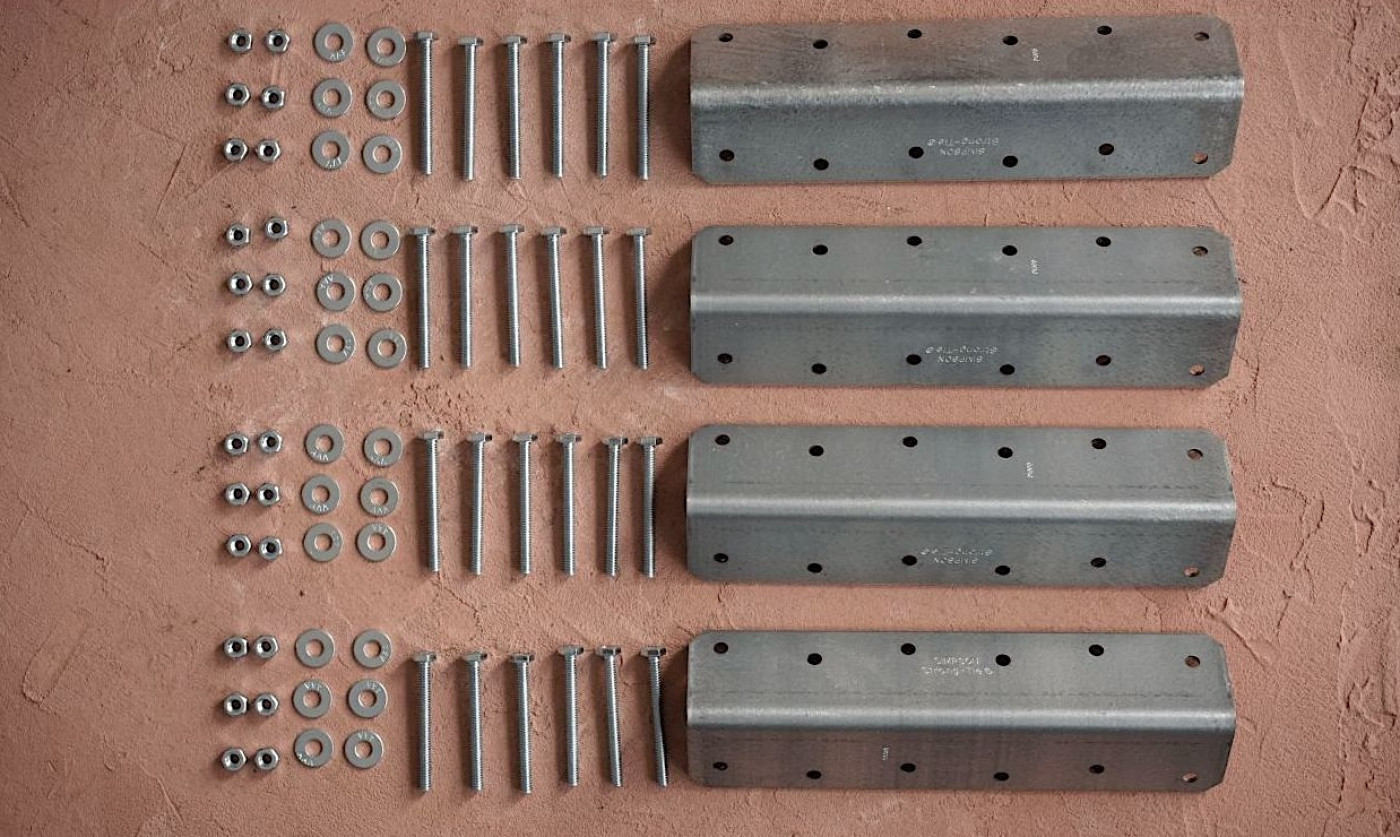
Supplies Needed for Wooden Raised Bed Construction
- 4 2"x6"x8' cedar boards (cut into 8 boards that are 4' in length)
- 4 framing angles that are 10" long*
- 16 or 24 1/4"x2-1/2" hex screws*
- 16 or 24 1/4" washers
- 16 or 24 1/4" nuts
*adjust sizes as needed for your own project
Let's look further at some of the supplies to make sure you're buying the right materials, and where it matters most, the highest-quality materials.

Untreated Cedar Boards for Raised Bed Construction
I like working with cedar because it's an incredibly durable wood that will perform well for years to come. (Learn more about the best types of wood to use for raised beds.) Pine is a much cheaper option, but your raised bed will have about 1/10 of the lifespan of a cedar bed. Whichever wood you're using, make sure to avoid boards treated with chemicals that could then leach into your soil (and therefore into the food you're going to eat).
I also recommend buying the thickest boards you can afford, preferably at least 2 inches thick. You'll get more life out of your raised beds and be able to enjoy them for longer if you avoid the temptation of buying something only 1 inch or so thick. The best value is often a 2"x6"x8' board, which means it's 2 inches thick, 6 inches tall, and 8 feet long.
I like to shop in person so I can stack all the boards and line them up next to each other to check for damage and ensure each board is as straight as possible. If you're building a 4'x4'x1' bed, ask the store to cut these boards in half to create eight 4' long boards.


Framing Angles for Easy Raised Garden Bed Construction
Framing angles, which can be purchased in the decking department of your local hardware store, allow you to create a clean design with minimal wear to your boards. Using a framing angle in each interior corner means you don't have to purchase extra wood for trim.
Purchase the tallest framing angle needed to connect your two boards vertically (framing angles often come in 4", 8", and 12"). Before you check out, place one of the framing angles in the length you've selected inside the two boards when they're stacked on their sides vertically and make sure the angle fits inside.


Just in case: Show the store manager the box pictured below to find the proper framing angle. Framing angles are generally made by Simpson and kept near other angles and joiners for deck designs.


Hardware to Build Raised Bed
Purchase hex screws that fit the holes of the framing angles you've selected and that are 2.5" long. I've found that 1/4" in diameter usually works. Make sure you're grabbing fully threaded screws (meaning the shaft is covered in texture all the way to the head of the screw).
You can do 3 hex screws per side (6 total per corner) or just 2 per side (4 total per corner) for a shorter bed. That means you'll need 16 or 24 hex screws in total. Match your hex screws with 16 or 24 washers and 16 or 24 nuts. Make sure to test your screw-nut combo and make sure everything fits.
BTW: The hex screws and hardware pictured are zinc, which is a food-safe material—don't worry!


All right, once you have all your supplies and tools ready, it's time to get building!
Download our free eBook so that you can easily print these instructions and take them to the hardware store with you. When in doubt, show the pictures of the supply list to an employee to help you grab what you need.
Directions to Build a Raised Garden Bed
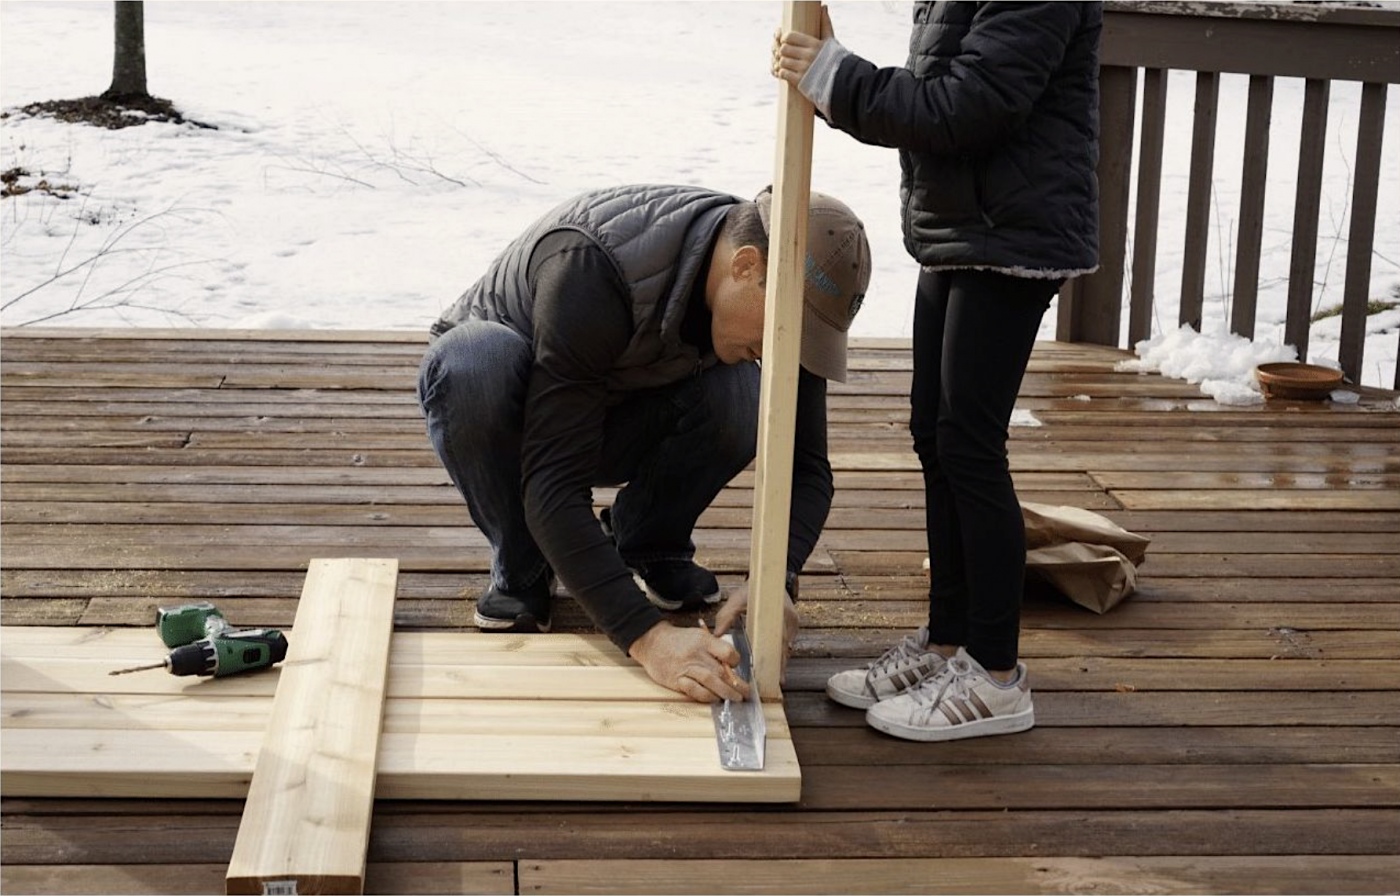
Step 1: Measure the Boards to Build the Raised Bed
Measure the exact thickness of the wooden boards you purchased. Hardware stores will usually say they're 2" thick, but they're often thinner than that in reality. The ones that I bought, for instance, were actually 1 3/4" thick. Mark that thickness along both edges of the four boards to create a straight line (this is where the tip of the other board will lay flat against this board).
Note: The side that you're marking will be the inside of the raised bed.


Step 2: Mark Where Framing Angles Will Go
Line up the framing angle along the line you've created and mark inside 2 or 3 holes, depending on how many hex screws you purchased for each side. You'll drill where these holes are, so make sure you're not marking in between two boards. Also check to ensure there will be at least one hole per board.
Double and triple check your marks! I'm sure you've heard the expression "Measure twice, cut once," right? Well, the same goes for drilling holes.


Step 3: Drill
Carefully drill a straight hole in each place that you've marked.


Step 4: Attach Framing Angles to Create Panels
Attach each framing angle with the hex screw on the outside and the washer and nut on the inside. You should now have two panels complete with framing angles on both ends, as shown in the picture above. (Note that once boards are secured in place with a framing angle, I'll be referring to them as panels.)


Step 5: Begin Other Sides of Wooden Raised Bed
It's time to prepare the other boards. Line up two new boards along a framing angle that's already attached to a panel and make sure the edges are flush and straight. Mark holes on the two new boards for drilling.

Step 6: Complete 1st Raised Bed Corner
Remove the boards and drill holes in the places you marked.
Attach two boards to the framing angle with hex screws, washers, and nuts. Having a partner for this step to hold the boards steady is great!
You've now completed the first corner of your raised garden bed!


Step 7: Complete 2nd Raised Bed Corner
Repeat the same steps on the other side of this panel: Line up two boards, mark holes, drill, and attach those two boards with screws, washers, and nuts. Again, a partner is really helpful (bonus points if they're cute!).


Step 8: Check Angles
Check the angles on your U-shaped bed so far. They should be flush and 90 degrees. I like to use a framing square (pictured below) to double check.
Lay the U-shaped structure down.
Slide in the final panel with framing angles attached.


Step 9: Complete Wooden Raised Bed
Mark holes to attach the final panel to the U-shaped bed.
Drill holes where marked.
Attach the panel with final sets of screws, washers, and nuts.


Step 10: Tighten Each Bolt
Once each angle is secured, go back and tighten each bolt with a bolt tightener. Don't do this until you're certain the bed is as you'd like it.
When all bolts are secure, move the bed out to your desired location. It's time to fill this raised bed with soil and get growing!


Celebrate!
You just built a $100 raised bed that will last for many years, hold up under difficult weather, and grow the most beautiful herbs, salad greens, and veggies for you. Take a moment to celebrate! Pat yourself on the back, take a picture of your new bed, and tag us @gardenaryco on Instagram so we can see what you built!
Download our free eBook so that you can easily print these instructions and take them to the hardware store with you. When in doubt, show the pictures of the supply list to an employee to help you grab what you need.
DIY Raised Bed Modifications
DIY Raised Bed Modification: Change Size
It's easy to convert these instructions for a 4'x4'x1' raised bed into an inexpensive raised bed size of your choosing. Here are modifications to make a raised bed in the following sizes:
- 4'x4'x6" raised garden bed
- 4'x6'x1' raised garden bed
- 4'x8'x1' raised garden bed
- 2'x6'x1' raised garden bed
That final size is perfect for what we call a border garden—the rectangular shape makes it ideal for tucking along narrow settings like along a fence line, driveway, or side of your home.
You'll notice that the original bed is 12 inches deep, while one of the modifications is for a 6-inch-deep raised bed. Six inches is deep enough to grow shallow-rooted plants like herbs and lettuces. I grow a productive salad garden in my 4'x4'x6" raised bed. That little $50 raised bed saves me a lot of money in plastic boxes of salad greens from the grocery store each season! If you're hoping to grow root crops like carrots and radishes or medium-size plants like peppers, you'll need beds that are one foot tall or more. Learn more about how deep your raised garden beds should be.
4'x4'x6" Raised Garden Bed
- Purchase two 2"x6"x8' boards and have them cut to 4' each.
- Use 4" framing angles.
4'x6'x1' Raised Garden Bed
- Purchase six 2"x6"x8' boards and cut two boards to 4' each. The other four boards will be cut to 6' each
- Use 12" framing angles.
4'x8'x1' Raised Garden Bed
- Purchase six 2"x6"x8' boards and have only two boards cut to 4' each.
- Use 12" framing angles.
2'x6'x1' Raised Garden Bed
- Purchase four 2"x6"x8' boards and cut 2 feet off of each board to have four 6'-long boards and four 2'-long boards.
- Use12" framing angles.


The $50 Raised Garden Bed
This bed requires half the materials, so it's half the cost. Again, this depth (six inches) isn't ideal for deeper-rooted plants, but it's perfect for growing your own salad garden.
To build this raised bed, you'll purchase two 2"x6"x8' boards and cut each board in half for a total of four 4' boards. Use 4" framing angles and 16 to 24 1" hex screws.


DIY Raised Bed Modification: Add Trim
In my book, Kitchen Garden Revival, I have plans for a raised wooden bed with extra corner and top trim. These are the Gardenary signature raised beds, and I followed these plans to build the six 2'-tall raised beds in my Chicago garden that are featured throughout the book.
Note: for the trim pieces, you can use 1"-thick pieces of wood, which are cheaper than 2"-thick pieces.


DIY Raised Bed Modification: Ditch the Framing Angles
If you like the look of wooden raised beds but are worried about ensuring your corners are trim and securing them with framing angles, you can skip those steps during assembly. Simply purchase raised bed corners in lieu of framing angles and place the boards in the slots of the raised bed corners. Voilà, you're good to go!
When you're purchasing corners, make sure to double check the thickness of the boards that they'll accept. Most fit the standard of 2"-thick boards (which is really a bit thinner than that).
- The raised bed corners from Gardeners' Supply give a clean look to the edge of your beds thanks to their thin profile and the addition of the corner caps at the top. You have the option to purchase their naturally insect- and rot-resistant cedar boards; if not, the corners will fit any 2"-piece of lumber.
- The Oldcastle planter blocks from Home Depot are stackable up to 2 feet high. The material is food-safe concrete. This option doesn't give you the nice clean lines I prefer but definitely gets points for ease of assembly. There's not even any hardware involved.
Shop Our Favorite Wood Treatment
Made from naturally occurring plant and mineral extracts, this wood preservative penetrates wood fibers to provide protection from sun and water. A single application results in a long-lasting, maintenance-free surface. Will not wear off, peel or fade; treated wood develops a beautiful patina. This plant- and mineral-based formula is based on a special family recipe and has been used for 60 years.
Tips to Install Raised Beds
DIY Raised Bed Installation
There's something I call "worst first", meaning building and installing your own garden beds requires you to do the hardest work first before you get to do the fun part, like planting. Even though it's the worst, it's important to get it right so that you have a good setup for your kitchen garden.
Here are some of the hard decisions and hard work you'll have to put in before you can get to the good gardening part:
FIND THE BEST SPOT FOR YOUR GARDEN
I always struggle to pinpoint the best spot for my raised beds. You'll need a level area with at least six to eight hours of sunlight for your plants. Find our tips for choosing an ideal location.
REMOVE THE SOD
If you're installing your garden over lawn, you'll need to remove the sod first. I like to think of this as getting rid of the plants I don't like (grass) to make room for all the plants I do like (and can eat).
Kitchen Garden Revival
Kitchen Garden Revival is your invitation to ditch the messy, high-maintenance veggie patch and step into a new way of gardening, one that’s elegant, organized, and endlessly rewarding.

LEVEL THE GROUND BENEATH THE BED
When you’re setting up a raised bed, be certain the box is on level ground. We didn't take this step with our first beds, and we ended up spending a lot of time trying to raise parts of the bed with bricks once we realized the entire structure of our wooden bed was compromised. We also got sick of watching all the good soil we'd mixed washing out every time it rained.
To level the area, you can dig to remove higher areas or you can spread paver sand or gravel to raise lower areas.
LINE THE BOTTOM OF THE BED
If the bottom of your raised bed is open, put down a layer of weed barrier cloth or raised bed liner on the bottom and up the sides to prevent the soil from spilling out after a heavy rain and to deter weeds. If you have an issue with animals that come from the ground, add a layer of hardware cloth to keep them out.
FILL YOUR BED WITH GOOD SOIL
Fill your raised bed with the best possible soil to keep your kitchen garden plants happy and healthy. This is your opportunity to start fresh with incredible, nutrient-rich soil—one of the main reasons for building a raised bed in the first place. For years, I've used a sandy loam garden soil that's organic, natural, and doesn't include any peat moss products. Use our soil calculator to determine how much soil you'll need for your raised beds.


"Do It Yourself" Doesn't Have to Mean "Do It All by Yourself"
The list of things you can grow in a $100 raised bed is endless. Prepare for tons of tasty harvests!
If you're still feeling stuck or intimidated over building your own raised bed, don't worry. My book, Kitchen Garden Revival, delves deeper into picking a location for your kitchen garden and then walks you through the planning, designing, and building of your raised beds, plus how to plant and tend your favorite edible plants.
If you're more an online-course-type of person, check out our popular course, Kitchen Garden Academy. Over the course of eight modules, we walk you through the complete step by step to set up and grow in your own kitchen garden.
For maximum help setting up your own kitchen garden, find a garden consultant near you to come out to your space. A garden consultant in your area can also connect you with local carpenters or masons if you need a little extra help with the bed construction process.
I'm confident that you're going to love having raised beds if you choose to install them in your outdoor space, and we've got tons of resources to help you build your own gardening haven and start growing!


Start your dream garden. Watch the free class!

Learn More About Wood Raised Beds
Click on the Pinterest Icon below to save this post for late!

